Showing posts with label baking. Show all posts

Monday, March 5, 2012

Crack Brownies

I saw this recipe on a blog and tucked it away in my Recipes to Try folder on my computer. How could I not with a name like Crack Brownies! This past weekend we were headed to a friend's house to see some remodeling they did and I wanted to bring along a little something...and I remembered the crack brownie recipe! I thought I could try it out since there would probably be a ton of picky foods...so if they weren't that good..I didn't necessarily have to take ownership of them!

But, these did not disappoint they are a pretty damn good brownie..nice and fudgy with a secret ingredient to bring out the chocolate...Maldon Salt Flakes. It was funny to see people eat them..you could see them kind of look at the top wondering what was on them, take a bite, give a nod of approval and then ask...is it salt, or what am I eating?

So, overall I give the Crack Brownies a big huge thumbs up! Usually I bake and then it's operation get this stuff out of the house. However, 4 crack brownies are saved in a safe place for an evening snack for myself and the Mr.

So I pass on....Crack Brownies....

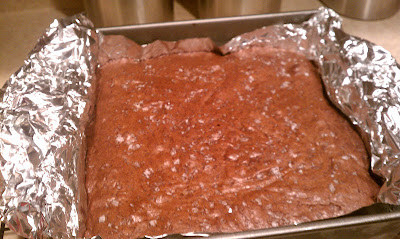
Here's the batter ready to go in the oven...one hint with brownies..go the extra mile and line your brownie pan with foil, let the edges hang over, and then grease the foil with crisco. You'll never have the fight of scraping a knife along the edges, or the edges come out and the middle is stuck there..makes for super easy clean pans and it's a cinch to get them out!

the secret ingredient..yeah it's salt flakes that cost me $8 but I rationalize that you can probably make 100 batches of crack brownies with one box.

 Fresh out of the oven
a little treat for my coworkers...

Crack Brownies
from www. theawl.com (here's the link)

1.5 sticks of butter
2 oz of unsweetened chocolate
1 cup of flour
2 cups of sugar
1/4 cup (heaping) of cocoa powder
3 eggs
2 tsp of vanilla
1 tsp Maldon salt flakes

Preheat your oven to 350 degrees.

In a small saucepan melt the butter and chocolate together. Allow it to slightly cool.

In a separate bowl, mix the dry ingredients, add eggs and vanilla and then the cooled butter and chocolate mix.

Take 1 teaspoon (mine was a heaping tsp) and evenly sprinkle the salt flakes on top of the brownies. Just make sure it's nice and even.

Bake for 35 minutes. Cool and cut into 16 brownies.

Monday, December 19, 2011

Holiday Tradition #2...

Now that the tree has been chopped down and decorated...in came another weekend and more fun little traditions. Yesterday was cookie baking day! usually I love to make a million different kinds and fill tins with an assortment of treats to deliver to friends. But, I went a different route this year..and instead made all sugar cookies and decorated them with royal icing.

Decorating sugar cookies takes a lot of patience..something I don't have. It's somewhat of a long process as well...since I jammed it into one day, the morning was spent making and chilling the dough, the afternoon was baking and cooling the cookies, and night time was set aside to get them decorated so they could dry overnight. My husband probably heard more four letter words come out of my mouth during the icing process...royal icing can be messy and is sometimes like glue, since it hardens up pretty quickly. But, once you get to the end result..it's all worth it!


Monday, May 16, 2011

Aunt Mariah's Lemon Sponge Cups

I love sweets..but I often hate that dessert comes at the end of a meal. If you have a great dinner, you're usually too full for a big decadent dessert..and that's why I loved this recipe for Lemon Sponge Cups. I made these for dessert on Easter Sunday. I knew my mom was going to whip up a feast..and she did..with lots of vegetables (yeah Mom for supporting my healthy eating habits!). So, when it came to dessert I didn't want this overly heavy we're way too full just cut me a sliver type of dessert..and these fit the bill! They had a custard base to them, yet the top cooked up in a light fluffy sponge cake ..all with a hint of lemon! This was a perfect end to our Easter and a great understated not too overdone sweet!

holy lemon zest...this gave you the lemony flavor

Some sugar, flour, lemon juice and butter gave me the base

then came the milk to make it a custard

I opted to try and get the mix into some little ramekins..

Thank god for my batter bowl from Pampered Chef..the spout on that bad boy made pouring these out a whole lot easier!

Note to self..when cooking in someone elses oven keep a close eye on your dessert..these were dangerously close to being over done...I got them JUST in the knick of time!


Aunt Mariah's Lemon Sponge Cups
Serves 4-6


2 tablespoons butter
1 cup sugar
4 tablespoons flour
1 lemon, grated rind and juice
1 1/2 cup milk
3 eggs, separated
1 pinch salt

Preheat oven to 350. In a large bowl, cream butter. Add sugar, flour salt, lemon juice and rind. In a separate bowl, beat egg yolks; stir in milk. Slowly add second mixture to first mixture. Beat egg whites until stiff; gently fold into mixture. Pour into ramekins or individual souffle dishes and place in pan of hot water. Bake in "moderate" oven (350, in my case) for 45 minutes. You will have a layer of lemon custard, with gorgeous, lightly browned sponge on top. Let cool a bit. Turn out and serve with whipped cream, or serve still in the dish. You can also bake this in one large souffle dish. Aunt Mariah likes to garnish with a thin slice of lemon. .

Just one note...on Easter we let them cool for an hour or two on the counter and they had a warm custardy taste to them. We brought 2 home with us and stuck them in the fridge,  I thought these were so much better chilled. The custard was creamier and the cake more lemony. I'd throw them in the fridge after cooling completely for an hour or two and then serve them. A dollop of whipped cream on top would have also been a great addition!


Enjoy!

Monday, May 9, 2011

10 Best Brownie Recipes ....Recipe #2 Milk Chocolate Brownies

I'm still trucking through the the 10 Best Brownie Recipes from www.epicurious.com blog. Last week was a mocha brownie...this week...a decadent milk chocolate brownie....

a recipe can't be too bad if it starts off with a big block of milk chocolate...my choice..Trader Joe's..great product at a great price.

The batter...lots of melted milk chocolate mixed with chopped milk chocolate...

Into the pan

the final product..a fudgy brownie with a ton of milk chocolate.

Milk Chocolate Brownies
from epicurious.com

Ingredients

1 stick (1/2 cup) unsalted butter
8 ounces fine-quality milk chocolate, chopped
3/4 cup packed light brown sugar
1 teaspoon pure vanilla extract
2 large eggs
3/4 cup all-purpose flour
1 tablespoon unsweetened cocoa powder
1/2 teaspoon salt
1/4 teaspoon baking powder

Directions
Put oven rack in middle position and preheat oven to 350°F. Butter and flour a 9-inch square baking pan.

Melt butter and half of chocolate in a 1 1/2-quart heavy saucepan over low heat, stirring, until smooth. Remove from heat and cool to lukewarm. Stir in brown sugar and vanilla. Add eggs 1 at a time, beating well after each addition, until mixture is glossy and smooth.

Whisk together remaining ingredients, then stir into chocolate mixture. Stir in remaining chocolate.
Spread batter in pan and bake until a wooden pick or skewer comes out with a few moist crumbs adhering, 25 to 30 minutes.

Just a couple notes....

this is a really rich but not overpowering chocolate brownie..probably because it uses milk chocolate vs. unsweetened or bittersweet chocolate. It is a smaller recipe..so if you're making a dessert for a crowd, probably not the best recipe to use but overall it's an excellent, fudgy, awesome brownie!

Enjoy!

Tuesday, May 3, 2011

Homemade Spinach Calzones

I get myself in this predicament a lot. Mr. Allan is traveling and I complain and complain about him being gone. Then, all of a sudden, it's the day he returns. I look in my fridge, thinking to myself..the husband is coming home tonight, and then see that I have in there milk, coffee creamer and, maybe if I'm lucky, a piece of fruit or two. This past Thursday afternoon, I found myself in that exact predicament. I remember thinking to myself that morning as I made my coffee, wow..there's almost nothing in the refrigerator. Then, as I was sitting in Court that afternoon..it hit me..Mr. Allan is coming home tonight..what the hell is the plan for dinner???

So, somewhere between talking to clients, running in and out of Court and getting my cases done, I decided I wanted to eat spinach. A pretty random thing to decide but I think it had something to do with the Oprah episode I watched on TIVO the night before where Bob Greene talked about his 20 years younger program and super foods. So, a dinner involving spinach it was. When I ran to Trader Joe's after work, the spinach idea came together when I mindlessly put a bag of whole wheat dough in my carriage with no plan in sight for it..and it all came to me. I was going to make some homemade spinach pies..or more like calzones as they turned out. ...so here's my adventure in pictures...

I started out with a bag of frozen spinach from Trader Joe's. I let it thaw while I went to yoga class. Then I put it in a strainer and pushed out the excess water with some paper towels. I started out with a little salt and pepper and a crushed garlic clove.

My next dilemma..what could I put inside that wasn't too bad for us. I knew I needed something to bind the insides of my calzone....Fat Free Cottage Cheese did the trick. I hate cottage cheese, I won't eat it plain, but if I sneak it into lasagna, or pasta dishes, or other recipes where I don't really realize what it is..I'm good to go. I added 1/4 cup of shredded cheddar, some sliced olives for a little salt, and Mr. Allan wanted some meat..so a very small amount of leftover Easter ham made it in there. Also..for a little spice..a 1/2 tsp of crushed red pepper.

Then came my battle with the dough. I cut it in half, sprinkled my counter with whole wheat flour and rolled it out into a rectangular piece.
I then lined a cookie sheet with foil, and draped the dough on there. I filled one side with the filling.

Then I folded the dough over and crimped it shut by using a fork. Here are the Mr. And Mrs. calzones ready to go in the oven.

My finished product..cooked at 425 for 25 minutes..it maybe could've used another 5 minutes.

I served it with a little side of marinara sauce to dip the doughier ends in...so filling!

My Spinach Pies or Calzones or whatever you want to call em!

1 bag whole wheat pizza dough
1 10-16 oz bag or box of frozen chopped spinach, thawed and drained
3/4 cup fat free cottage cheese
salt and pepper to taste
1/2 tsp of crushed red pepper
1/4 cup sliced black olives
1/4 cup shredded cheddar
1-2 crushed garlic cloves
optional--meat if desired..some turkey pepperoni..or as we did..leftover Easter ham!

Mix all ingredients (obviously not the dough!) Preheat oven to 425. Cut dough in half and roll out each half on a floured surface to a approx. a 12" long rectangle. Position dough on a foil lined cookie sheet. Place filling on one half of the dough. Fold dough over and crimp edges shut. Poke one or two holes on top. Bake for 25 minutes or until the top is a dark golden brown.

the only thing I may have done different...next time I might brush the outsides of the calzones with a little bit of olive oil to give the whole wheat dough a little something something!

Enjoy!


Monday, May 2, 2011

10 Best Brownie Recipes...Recipe #1

I look at tons of baking and cooking blogs. Some I'm loyal to because the recipes are always so good and others I just look at for the pretty food pictures. While perusing some last week, I went to a good handy blog...the blog associated with epicurious.com...the peeps at Bon Appetit magazine.  One blog post caught my eye...their 10 Best Brownie Recipes. I'm a sucker for brownies and have been on a brownie kick..so this was right up my alley. So...here's the first recipe off their top ten list!

Double Chocolate Mocha Brownies...I'm a coffee lover and a chocolate lover..so these were my must try first recipe!

Any good brownie recipe made from scratch usually starts with these two ingredients...butter and chocolate. These double chocolate mocha brownies had a base of unsweetened chocolate

Some sugar and instant espresso powder

The other chocolate in these double chocolate mocha brownies..some semi sweet chips that were tossed with the flour

Put them all in one bowl and mix them together and you get a pretty decadent batter

Into a foil lined pan that was coated with butter..kind of a pain to do but makes for a super easy removal from the pan and no weird brownie chunks stuck in the corners.

Fresh out of the oven...
Freshly cut...

A close up of these...they were soooo good. On a brownie scale...a 9 in my book. Just a nice, not loaded down with too many nuts and other crap, good brownie with a hint of a coffee kick!

Then, I had to get them in my little plastic carrier to tote to work the next day so Mr. Allan and I don't eat them!


Double Chocolate Mocha Brownies
(from http://www.epicurious.com/)
1 1/2 sticks (3/4 cup) unsalted butter
5 oz unsweetened chocolate, coarsely chopped
2 cups sugar
1 tablespoon instant-espresso powder or instant-coffee granules
1 teaspoon vanilla
1/2 teaspoon salt
4 large eggs
1 cup all-purpose flour
3/4 cup semisweet chocolate chips


Preheat oven to 375°F. Line a 15- by 10- by 1-inch baking pan with foil, allowing 2 inches of foil to hang over ends of pan, and grease foil well (except overhang) with 1 tablespoon butter.

Melt remaining 11 tablespoons butter with unsweetened chocolate in a large metal bowl set over a pan of barely simmering water, stirring until smooth. Remove bowl from heat and whisk in sugar, espresso powder, vanilla, and salt (mixture will be grainy), then add eggs 1 at a time, whisking after each addition until batter is smooth.

Toss together flour and chocolate chips in another bowl and add to batter, stirring until just combined.

Spread batter evenly in baking pan and bake in middle of oven until top is firm and edges just begin to pull away from sides of pan, about 20 minutes (do not overbake).

Cool in pan on a rack 5 minutes, then carefully lift brownies from pan by grasping both ends of foil and transfer to rack to cool 10 minutes more. Cut into 32 squares and lift brownies off foil with a spatula.

Enjoy!

Thursday, April 28, 2011

The Best Banana Bread Recipe

That's the claim on the this recipe. That's what sucked me in. Once I read it, I knew I needed to try this right away to see if the claim was true or not. I'm glad to report..I think it's pretty damn close!

So, how did I find this recipe? I became obsessed with the idea of brownies a couple weeks ago. To me, they're a perfect treat to bake. You can cut them small, there's a big hit of chocolate, and you're satisfied without eating a 5000 calorie cupcake drenched in frosting. So, I was on a baking kick and perusing the Epicurious blog (the blog from the peeps at Bon Appetit). One post caught my eye...Aunt Holly's Banana Bread. I opened it and the author of the blog claimed it was the absolute best he'd ever had. I love me some banana bread..especially because I can't stand when the bananas in the fruit bowl get one tiny brown spot..so if they get weird, they're popped in the freezer for later use. Unfortunately...or maybe fortunately for my work peeps...my freezer had way too many nanners! So..this recipe was up to get tested!

One thing I loved...a nice batter without a lot of ingredients. I feel like most banana bread recipes have buttermilk, lots of oil etc...this one had none of it!

Fresh out of the oven...this smelled sooooooo good!

Since Mr. Allan was away on business on this particular day...the bread got sliced up for the work people...

The original recipe suggest some chocolate chips or maybe some nuts..I had both on hand...so a handful of chocolate chips and some leftover walnuts made their way in!

So...here we go...the Best Banana Bread..also known as Aunt Holly's Banana Bread!

Aunt Holly's Banana Bread
(from epicurious.com)

3 to 4 ripe bananas
1/4 cup melted butter
1 cup sugar*
1 1/2 cups flour*
1/4 teaspoon salt
1 egg, beaten
1 teaspoon baking soda
Chocolate chips (as many as you want!)


Preheat oven to 350. In a bowl mash bananas with a fork. Add in all ingredients but eggs and chocolate chips. Stir well. Add in beaten egg. Add in chocolate chips and nuts if desired.

Bake for 50-55 minutes.

* I took some advice from some reviews that were on epicurious. One was to cut down on the sugar. Some described it as too much and the sugar masked the banana taste. I used 1/2 cup of sugar.
* I also used a mix of whole wheat and white flour. I used 1 cup whole wheat flour and 1/2 cup of all purpose flour. I didn't go all the way whole wheat, because whole wheat flour has a little bit of a mealy texture and I was unsure how it'd affect the bread.

I brought the tray of banana bread to work..I set it out near our coffeemaker at 8:45 and it was gone by 9:15. Rave reviews! In fact...I'm saving 2 pieces for Mr. Allan to have when he comes home from a business trip...but they're calling my name right now!!! We'll see if they make it! This was moist, delicious and definitely a keeper!

Enjoy!

Tuesday, April 26, 2011

Ginger Apple Torte

My dad and stepmother came for dinner a couple weeks ago. While I like to cook..I LOVE to bake...I went on the search for a nice cake..I didn't want one drowning in sugary frosting, too loaded with chocolate, or this huge cake for just 4 of us.

A website and blog I love to follow...Food 52. I went on over and started to look at their top ranked recipes...this one caught my eye...Ginger Apple Torte. It wasn't this larger than life way too many ingredients including everything but the kitchen sink recipe. It looked sophisticated and tasty and right up my alley since I've been on a fresh ginger kick!

First off..the dry ingredients sifted together... 

Nothing smells better than apples on the stove top...

Apples make the base for this torte in a springform pan

batter on top..then walnuts pressed in and some turbinado sugar on top

Fresh out of the oven...this smelled so good!

I was also very excited to use my cake holder...

I loved how you cut into this cake and there were apples everywhere

Instead of whipped cream...a scoop of vanilla bean was a perfect pair to this torte!


Ginger Apple Torte (from http://www.food52.com/) 
Ingredients 
3 large apples (I used Honeycrisp and Fuji.)
4 tablespoons turbinado sugar, divided
1/2 cup (1 stick) unsalted butter + ~2 TB butter + more for pan
1 1/2 cup all purpose flour
1/2 teaspoon baking soda
1/4 teaspoon kosher salt
1 teaspoon cinnamon
1/2 teaspoon ground cloves
1/2 teaspoon ground allspice
1 teaspoon ground ginger (if you want more of a gingery kick; optional)
3/4 cups brown sugar
2 large eggs
1 tablespoon lemon zest
1 tablespoon grated fresh ginger (I peeled a 2 inch piece and grated it with a microplane grater)
1 tablespoon molasses
3 tablespoons dark rum
1 teaspoon vanilla extract
1/4 cup milk
1/2 cup plain Greek yogurt
10 walnut halves

Preheat oven to 350. Butter a 9” springform pan. If you are concerned about your springform pan leaking, wrap the bottom with aluminum foil

Core and peel apples, and cut into thin slices. Melt ~2 TB of butter in saucepan and cook until it is lightly browned. Stir in apple slices until all slices are covered with browned butter. Sprinkle ~2 TB turbinado sugar over apples, and continue to saute, stirring occasionally, till apples are softened and most of the liquid has evaporated. Set aside

In a medium bowl, stir together flour, baking soda, cinnamon, cloves, allspice, ginger (if using) and salt. Set aside

In a stand mixer fitted with the paddle attachment, cream butter and sugar till fluffy. Beat in two eggs. Beat in lemon zest, ginger, molasses, rum, and vanilla extract. (The mixture will look curdled. It's OK.)

Stir in the flour mixture a little at a time, stirring after each addition so the batter is thick and smooth. Fold in the milk and yogurt till batter is smooth and thoroughly combined

Scrape half the batter into the prepared springform pan. Cover with apple slices, and spread the other half of the batter over the apples. Smooth top with spatula. Place walnut halves on the top of the cake, and sprinkle the remaining 2 tablespoons of turbinado sugar over the top of the cake

Bake for 50-60 minutes, or until the top of the cake is golden brown and a tester inserted into the center comes out clean. The cake may slightly pull away from the sides of the pan

Transfer to a cooling rack. Run a knife along the edges of the cake to loosen it completely from the sides of the pan. Open the ring and remove it. If you want to remove the cake from the base of the springform pan, wait until it has cooled completely, then slide a long thin spatula between the cake and the base. Use a large spatula to then move it to a serving plate.

Serve as is or with a scoop of vanilla ice cream or a blob of barely sweetened softly whipped cream.

Enjoy!

Friday, April 22, 2011

Daddy's Bangor Brownies

I've had a thing for brownies lately...they're pretty easy to make, there are a million different combinations, and well, I feel less guilty eating a little brownie rather than a slab a cake, a decadent dessert or something smothered in frosting. So...you'll see lots of brownie variations. I tried to pinpoint some recipes that I thought were different..not your regular ole brownie recipe..so we're starting with Daddy's Bangor Brownies...they're not my Daddy's recipe..and I grew up in a place called Woonsocket..not Bangor...but I still thought they were good! These are a big cakey brownie..not a small bite and I thought they were pretty damn good!

These came out of a cookbook called the Best of the Best...it has different recipes from the best cookbooks as determined by Food and Wine Magazine. This particular recipe came from the cookbook Heirloom Baking with the Brass Sisters.

all prepped and ready to go!

How to tell if it's a good brownie recipe..if you're melting good chocolate...it's probably going to result in a really nice brownie!


here are the brownies ready to go. If you line your brownie pan with foil, then grease it, it makes for easy removal once they're baked. You let them cool and simply lift the edges of the foil (be sure to have an overhang on the sides). You can also use parchment paper, but I find the foil easier. It avoids the disaster of having your corners stuck in the pan. This brownie batter had the consistency of cake batter...this recipe ain't messing around!


Again..these were some serious brownies..if you're looking for an extremely dense intense chocolate flavor..probably not the recipe for you. But, if you like your brownies more like cake and less fudge like..these will be a hit with you!


Daddy's Bangor Brownies
Heirloom Baking with the Brass Sisters

1 1/2 cups flour, sifted
1 tsp salt
3/4 cup butter
1 cup brown sugar
2 cups sugar
6 eggs
6 ounces bittersweet chocolate, melted and cooled
2 tsp vanilla
3/4 cup milk
2 cups chopped walnuts

1. Set oven rack in the middle position. Preheat oven to 350 degrees. Line a 9 by 13 pan with foil and coat generously with a vegetable spray.

2. Sift together salt and flour and set aside.

3. Place butter, brown sugar, and sugar in the bowl of a mixer and cream together with paddle attachement until light and fluffy. Add eggs, one at a time, then cooled and melted chocolate. Mix together the vanilla and milk and then add the dry ingredients alternatively with the milk mixtures, mixing well after each addition. Fold in walnuts.

4. Pour batter into pan. Bake for 30-35 minutes or until a tester comes out dry. Cool to room temperature and refigerate until cold. Cut into squares or triangles and sure.

Just a couple notes...Mine took way longer to cook...like an additional 15 minutes, so you need to keep a close eye on them. My oven is pretty good with temperatures...but I took these out and they were very batterlike inside and not done. I also didn't refrigerate them...they cooled and Mr. Allan and I dug in!